The points or vertices, specified for a measurement can be changed in a number of ways including adding new points or by deleting and moving existing points.
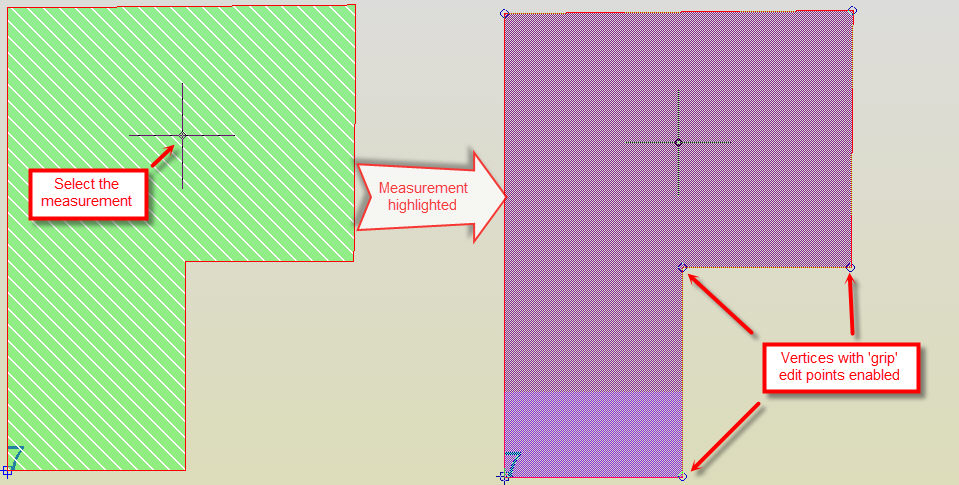
To access the vertex editing features, click on a measurement. It will be selected and 'grip' editing points, in the form of circles, at each vertex or key point will be displayed.
Grips provide the means to easily select and modify one or more vertices to alter an existing measurement.
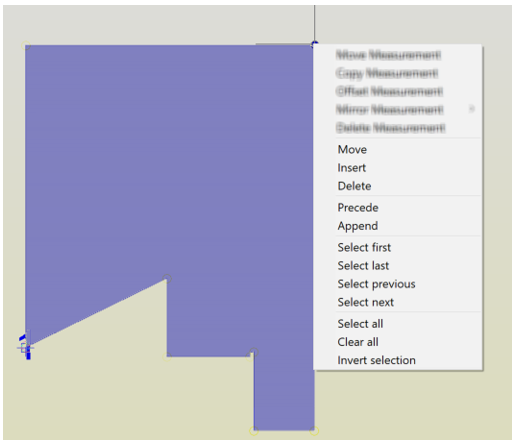
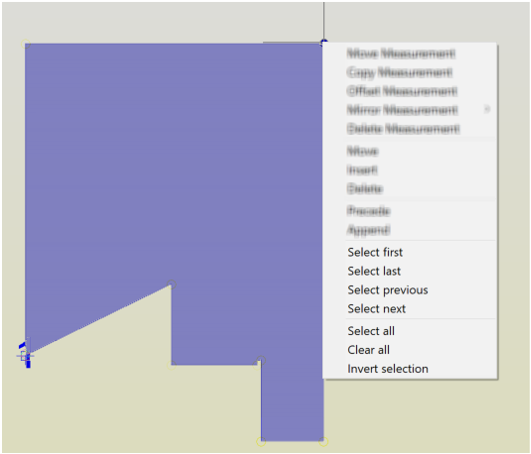
Right-clicking on a grip will display a full context sensitive menu listing the vertex editing options similar to the following screenshot:
Once measurement editing has been completed, press the Esc key to cancel grip editing and de-select the measurement.
When specifying the new location of vertex point with a 'rubber band' line from a previous point, you may press and hold the Shift key to put the system into 'ortho mode' so, regardless of where the cursor is, the rubber banding line and new point will be vertically up or down or horizontally across the screen. Release the shift key to return to non-ortho mode.
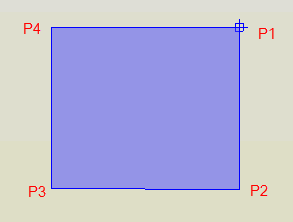
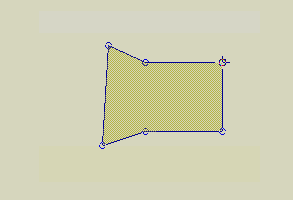
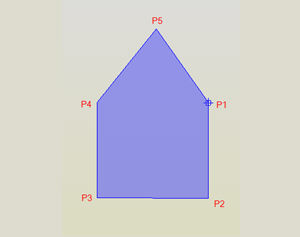
The following Area measurement was originally taken by picking points P1, P2, P3 and P4 and is going to be used in the examples that follow. While an area measurement is used here, the editing options apply equally to other types of interactive measurement.
Whilst grip editing commands are normally performed on the single vertex at which they were activated, it is possible to perform the same operation simultaneously on several grips at the same time. To activate multiple grips, hold the shift key down during selection and click on each grip required. The circular grip markers will become filled and subsequent operations will operate on all those selected. The example below shows two points selected for a Move command
To move a point of the measured area.
This is the default edit option when the area to be edited is selected.

Select the measurement to edit so that it is selected, right-click on the grip of the measurement point to move and select the Move option. Alternatively, and more simply, click on the grip of the measurement point to move and move the cursor to the new location of the measurement point. Click to specify the new point location.
To add a new vertex to a measurement.
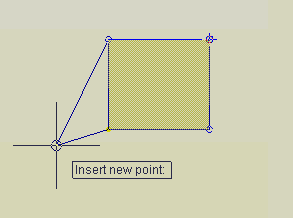
Select the measurement to edit so that it is selected, right-click on the grip at the measurement point prior to where the new vertex is to be inserted (P3 in the above example) and select the Insert option. A new vertex can now be inserted.
Move the cursor and pick the point where the new measurement point is to be located. Continue to insert additional measurement points or press the Enter key or right-click to complete the operation.
To delete the selected vertex point of a measurement, select the measurement to edit so that it is selected, right-click on the grip at a measurement point to be deleted and select the Delete option.
A confirmation dialog box is displayed.
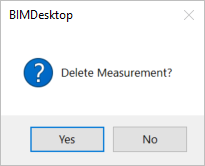
Select No to abort the deletion of the vertex or Yes to confirm the delete the measurement point (s).
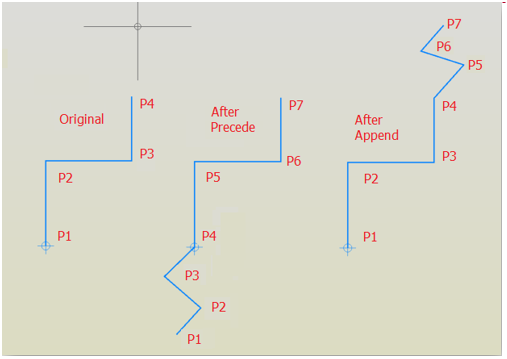
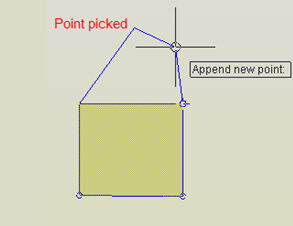
The Precede and Append edit options insert new vertices before the first or after the last measurement points respectively. With an ‘open’ measurement such as a Continuous Length, the effect of these actions is clearly visible and understood.
With a closed measurement such as the Area used in this example, the measurement is first made ‘Open’ by removing the line which joins the first and last measurement points. With both Precede and Append, points are then inserted into this enforced gap. As the gap is automatically closed again once editing is completed, the results of using either Precede or Append may appear very similar. The difference is the position of the new points in the resulting sequence.
In the running example, a new vertex is to be inserted between point P4 and P1.
First let us try the Precede command. Select the measurement, right-click on any grip and select the Precede option. A new point can now be inserted before the first point of the measurement.
Move the cursor and pick the point where the new measurement point is to be located. Continue to insert additional measurement points or press the Enter key or right-click to complete the operation.

Precede: Each successive new point becomes the first measurement point and the others are reordered to suit.
Precede: Reassignment of measurement points
Let us now try the Append option: Select the measurement, right-click on any grip and select the option ‘Append’. A new point can now be inserted after the last point of the measurement.
Move the cursor and pick the point where the new measurement point is to be located. Continue to insert additional measurement points or press return to complete the operation.
Append: Each successive new point becomes the last measurement point; others remain as-is.
Append: Reassignment of measurement points
Navigation and Selection Commands
As already stated, the grip editing commands can operate on one or more grip points at one time. To make it easier to navigate between and to select grip points, particularly on measurements with large numbers of points, several commands are provided to assist with navigation and selection.
Most of these are self-explanatory including: Select First, Select Last, Select Previous (which will select the point before the current grip and Select Next which will select the point after it).
Select All will select all the grip points simultaneously causing edit commands such as Move and Delete to operate on the entire measurement. Clear All will deselect any grips selected at that time regardless of how that selection was made. Invert Selection will cause all grips which are already selected to become deselected and all those which were not selected to become selected. They are often used in combination to improve efficiency of selection, so for example, where all grip points except say the first two need to be selected, rather than using Shift Click repeatedly to select all points bar two, you could use Select All then use Shift Click to deselect those two.
Special Cases
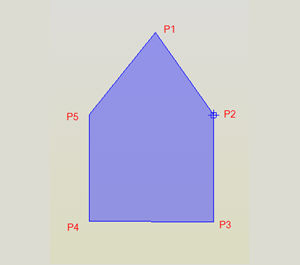
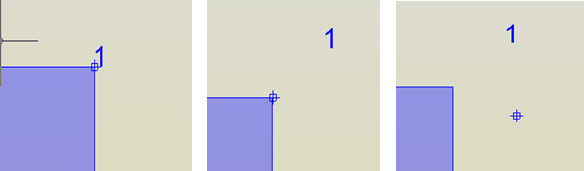
When clicking on the first point of a measurement the Insert and Delete options may appear to be disabled. This is because the Measurement Marker and/or Measurement Number (which may be situated at the same point as the measurement point or grip) has been selected instead. While the Measurement Marker and Measurement Number can be moved independently of the measurement point (i.e., the default edit option and as shown below), most of the other grip edit commands (such as Delete or Insert) do not apply.
It is possible to move the first vertex by selecting a point close to the grip point but quite often either the measurement marker or measurement number may be moved inadvertently. In these circumstances it is recommended that another grip point is selected and select the Select first option from the right-click menu used is selected to ensure that you are acting on the first measurement point rather than the marker or number.