To create a new measurement style, perform the following steps:
1. Click the Styles button ![]() on the
Manager panel of the Settings
ribbon.
on the
Manager panel of the Settings
ribbon.
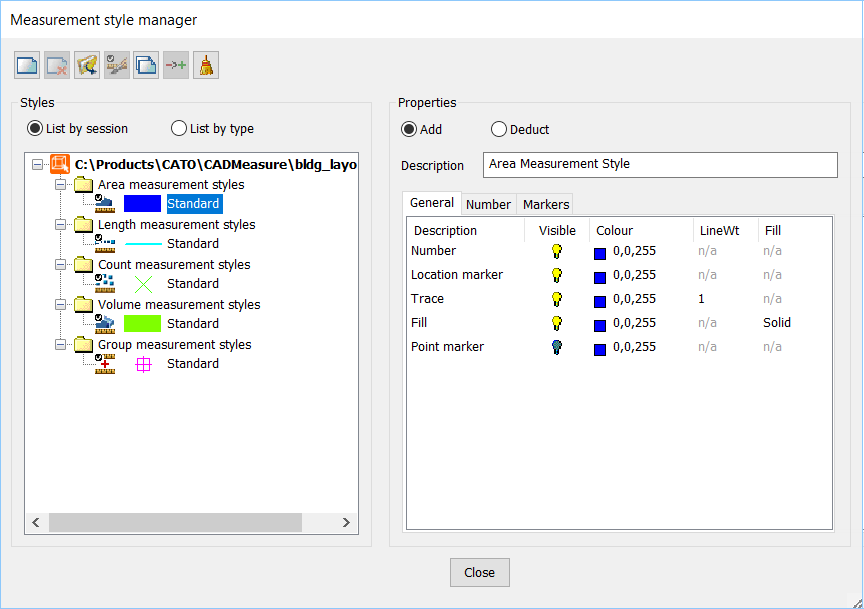
The Measurement style manager dialog box is displayed. The style types are listed in the left-side tree. Click a style in the tree to display its properties in the right-side pane.

2. Select the description of the style type you wish to create. For example, Area measurement styles.
3. Click the New display style button ![]() on the toolbar.
on the toolbar.
This new entry is added for the selected style type.
4. Rename the new entry.
5. Change the properties as described in the following table:
You can customise the following style changes for each property in the General tab:
· Visibility:
Click the button under the column to show or hide the property. ![]() indicates the property is
shown and
indicates the property is
shown and ![]() indicates the
property is hidden.
indicates the
property is hidden.
· Colour: Click the colour icon under the column to choose the colour you wish to select for the property.
· Line/Wt: Click the field under the column to update the line width or weight.
· Fill: Click the to select the fill style and this column is enabled only for the Fill property .
Note: The above fields are enabled if it applies to the corresponding property.
Property |
Description |
General tab |
|
Number |
Customise the style of the number displayed for the measurement. |
Location number |
Customise the style of the location number. |
Trace |
Customise the style of the trace. |
Fill |
Customise the fill style for the selected measurement. For example, in case of Length measurement styles, the fill can be Solid, Crosshatch, Vertical, Horizontal, etc. |
Point marker |
Customise the style of the point marker. |
Number tab |
|
Layout
|
Initial Location Closed: Select where the number must be placed with reference to the object in case of the closed measurement. |
Initial Location Open: Select where the number must be placed with reference to the object in case of the open measurement. |
|
Text |
Text Colour: Click and select the text colour. |
Sizing method: Select the sizing method of the number from the drop-down list: · % screen size: the size of number is adjusted based on the screen size. This option is selected by default. · Absolute: the size of number is not adjusted based on screen size. |
|
Size: Click and update the size of the number displayed for the measurement. |
|
Angle: Click and update the angle of the number displayed with reference to the object. |
|
Font: Click and select the font from the drop-down list. |
|
Info Box |
Line Colour: Click and select the line colour. |
Linetype: Click and select the line type from the drop-down list. |
|
Lineweight: Click and select the weight or thickness of the line from the drop-down list. |
|
Fill Colour: Click and select the fill colour for the line. For example, the following screenshot has the above fields filled to get the info box style in the right side.
|
|
Markers tab |
|
Location |
Customise where the markers must be placed with reference to the object: · Start: The marker is placed at the starting point of the measurement. · Centroid: The marker is placed at the centroid of the measurement. For example, the marker is placed at the centroid of the triangle in case of an area measurement similar to the following screenshot:
· Middle: The marker is placed a the middle of the measurement. For example, the marker is placed at one of the side's middle of the triangle in case of an area measurement similar to the following screenshot:
|
Point |
Customise the point type and select the type of the pointer to use: · Click the Type column. The Marker Symbols dialog is displayed. · Click the marker symbol you wish to use.
|
Rise |
Customise the rise properties of the marker. |
Fall |
Customise the fall properties of the marker. |
6. Click Close.
Alternatively, you can right-click on an existing style and select the Copy display style option.
The styles are now be available to set as default in the Next Measurement panel of the ribbon or to change the existing style of a measurement via the Properties panel.